So ever since I moved into the flat 5 years ago, the bathroom has been somewhat of a bug bear for me! Although I did a “bathroom on a budget” makeover in 2017 (Click Here), this was still a room that bugged me – it just didn’t feel complete.
I decided to give the bathroom an overhaul in a way that was both finance friendly and style conscious – great if you’re in a rental, or like me, re-styling on a budget. Keeping costs down meant that I was going to have to stick with the original white bathroom suite and tiles and focus on cost effective ways to bring a new lease of life to these. It was at this point that I sat down, cup of tea in hand, and explored the different avenues to modernise the bathroom with limited DIY skills (neither Dave nor I can tile and that wasn’t a job we were going to attempt!) on a budget
Before
Finding a starting point …
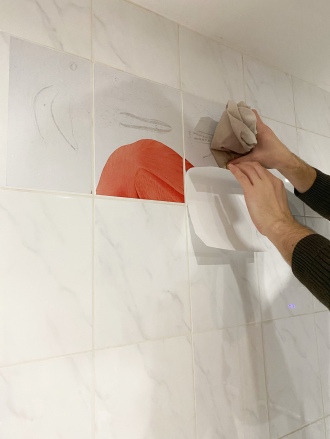
Given that the tiles are a large part of the bathroom – featuring on almost half of the wall space – I poured myself a second cup of tea and began researching how I can freshen up the tiles – This led me down all sorts of avenues from a plethora of varieties of tile paints to adhesives plastic tiles (you know, like the bathrooms in a Travelodge). However nothing was really standing out to me until the next day it suddenly cane to me – somewhat of a lightbulb moment whilst I was in the middle of some graphic designs at work. I thought to myself, if I can have vinyl stickers put onto our loan vehicles and these can stand the stern test of storm Ciara (and more recently storm Dennis!), then surely they will be able to handle a light dusting of shower water, mixed with some shampoo and conditioner, no? Not wanting to waste any time, I headed over to the printers opposite work to explain my idea. Despite them looking stunned, and no doubt appearing puzzled as to why I would want to put vinyl on my bathroom tiles, they didn’t say I couldn’t! This was all the confirmation I needed and so all that was left was to determine what I was going to stick onto my tiles!
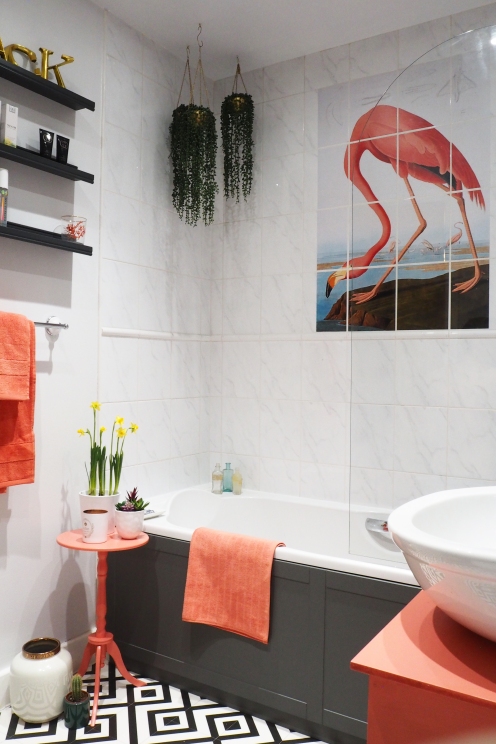
Ok, so I didn’t need to think too hard about this one – The infamous flamingo print is a piece of artwork I’ve always loved but lacked adequate wall space to display it and so that evening I grabbed a tape measure and photoshop to plot out my mural. With this locked down, and giving me a steer on my colour palette in the process, this created the perfect starting point to plot out the remainder of my bathroom on a budget makeover.
A fresh and modern style…
When it came to modernising the old suite, I knew that one of my least favourite aspects (and one that is the first thing you cast your eyes on as you enter the bathroom) is the bath panel. The existing white plastic bath panel had been in place since before I bought the flat and after daily use for many years was starting to show signs of discolouration and damage (and all in all just a bit nasty). So, when Better Bathrooms offered to help me out by gifting me the beautiful ‘Nottingham dark grey shaker panel’ (Click here) I jumped at the chance to make this a feature of the makeover.
In fact it was only when I was talking to Sophie at Better Bathrooms that some other ideas came to mind. Sophie suggested that a great way to give a bathroom a quick and easy freshen up would be to replace the existing taps without needing to replace the entire sink and bath. This sounded like a great way to drag the bathroom out of the early 00’s (or maybe even late 90’s!) and Better Bathrooms were very kind and willing to provide me with these extra touches. However, whilst they have a wonderful selection of different styles on offer, I knew that I needed to be true to my style in this area – which is why I avoided a very modern tap and opted for the classic pegler designs (timeless classics) of the ritz basin taps for the basin and mira virtue filler tap for the bath. As I look back now, where I am able to see the end result of the makeover, I have to say that Sophie could not have been more right – the fresh new taps lift the room and add a sense of quality and sophistication to the finish – something it previously lacked. (And even though my Dad had to fight the old taps off of the seized copper pipes I’d still recommend you aren’t put off from replacing the taps on an existing suite!)
Cabinet creations…
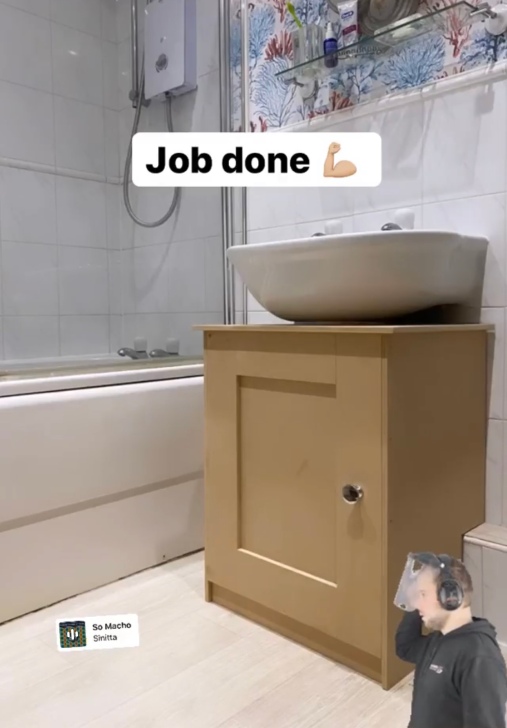
With a lot of modern bathrooms there is the much loved style of having the basin sat on a cabinet. Whilst this is a design that I too love, if I were to attempt this it would have involved re-tiling (which would have quickly turned this into a much bigger, and more costly, job). As a compromise I looked at under sink cabinets which can be bought on the high street, but as those of you who follow me on Instagram will know, I’m not a fan of the fact they leave a shortfall in height, creating an unsightly gap between the top of the cabinet and the bottom of the basin!
This was going to be one where I’d have to repurpose an existing cabinet to meet my needs! And so after numerous cups of tea (and hours of scrolling Facebook marketplace and ebay in an attempt to find a cabinet 67cm high whilst still being deep enough for the basin), I gave up and decided to take control of the situation! The only way that I was going to find one to the spec I needed would be to construct my own cabinet!
I once again pulled out my tape measure and this time a piece of paper to sketch out a solution. With my plan in hand I headed to B&Q – Armed with my list of measurements and my Yorkshire charm, I got the kind man to cut the all panels to size for me. This meant that all I had left to do was “screw and glue” – a simple 30 minute job!
Don’t be floored by change…
The last major job would be to address the bathroom flooring. The room is only a small space and so I was lucky enough to have found an off cut at Best for Flooring for a bargain price of £45 in the style I loved. The last time I undertook a budget makeover of the bathroom I almost opted for this floor and although I knew it wouldn’t go with my wallpaper, I had always regretted not going with it. I love the modern geometrical twist on a classic black and white flooring. For those of your worried about laying a floor you’ll be pleased to know that it is not as difficult as you’d first think. If like me, you had an existing flooring to remove then do this carefully. If you are able to take up the old lino without too much damage then this can act as a template to cut the new piece to size. This meant that all we had to do was cut the new lino to size, apply some double sided tape to the floor, position the new lino in place and run a sealant around the edges. Ok – so I make it all sound very easy don’t I – Trust me it isn’t difficult, just be prepared to persevere with getting it in exactly the right place without any air bubbles/ripples – it can get a bit fiddly but nothing too stressful!
And onto the walls…
I knew I wanted to keep this room a light and bright space – being an apartment, the bathroom is the one room which suffers from having no window or natural light. But brilliant white is no longer living up to it’s name – I found it too stark. Instead I decided to opt for a light grey to tie in with the light grey in the background of my new flamingo mural. I went for a Little Green paint colour called Shallows which I decided to stick with for my ‘5th wall’ (as dubbed on insta) – the ceiling – resulting in all walls and ceiling looking consistent.
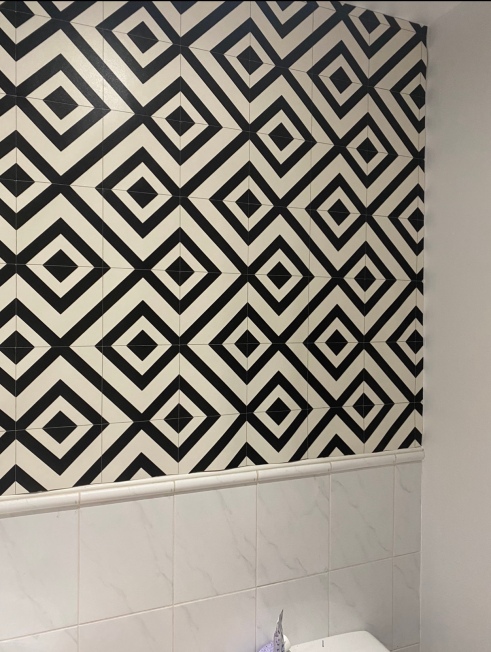
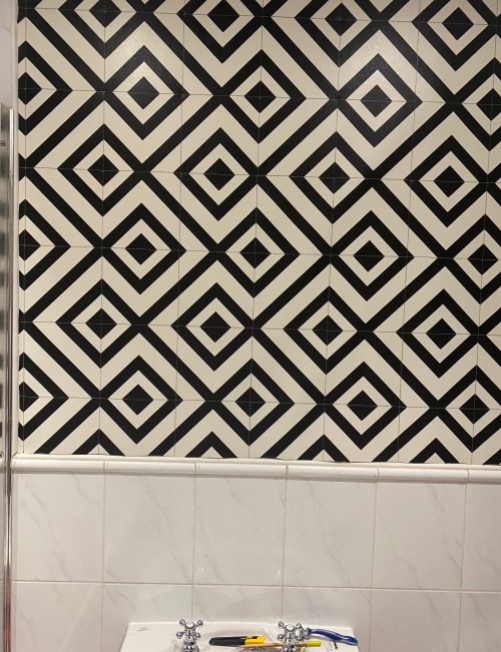
Well I say it made all the walls look consistent but I had just one more idea up my sleeve to add a bit of variety. I felt that the wall behind the sink needed something different and so I began thinking that a black and white chevron wallpaper would look great. But as I sat in the lounge looking at the remainder of my lino offcut, I remembered a clip from the show Interior Design Masters where one of the contestants used lino to cover a wall. This seemed like the perfect option as I wouldn’t be incorporating yet another pattern into the small room resulting in a clash of the monochrome accents! (Although on this occasion wallpapering would probably have been easier than tacking the job of attaching a geometric lino to the wall with a post birthday celebration hangover on a Saturday morning!)
We eventually managed this thanks to a roll of double sided tape and a bloody big bag of nails – Safe to say that this lino was not going anywhere after we finished!
The finishing touches…
I had originally planned on finishing the under sink cabinet with the same shade of grey as the bath panel. Plus, I’d already bought this colour to repaint the existing white shelves! However, something still wasn’t feeling right about this and so the grey paintbrush stopped with the shelves. The colour charts came back out and while I sat in the bath, next to the newly completed flamingo mural I came across a perfect match- Little Green Orange Aurora. There is no doubt about the fact that it adds a little bit of flamingo flair to the room and I was loving this colour so much that I felt I needed to incorporate even more of it into the room. But I was really running out of extra spaces to add this colour!
The walls were sorted, the tiles were complete and the flooring was looking great. It was at this point I decided that the mirror needed to be painted in the same colour along with a new addition of a small wine table, which sits at just the right height to rest a cheeky glass of rose on whilst I relax in the bath!
Talking of keeping well hydrated, no tropical flamingo would survive in this bathroom without a plant or two. But a my grandma will tell you, I’m not to be trusted with a live plant – forever taking them back to her for assistance in bringing them back to life – and so I was going to have to fake it. After seeing some faux plants which my friend had recently bought from Primark, I headed there to buy a string of pearl plants for a bargain price of £6 each – hanging them at different heights in the corners of the room to give that (almost) final finishing touch.
As with all bathrooms you need co-ordinated bathroom linen. I’m a lover of Christie towels – they are high quality, wash so well and coincidentally, they happen to stock their range of towels in the exact same colour as my flamingo!
All in all, I’d say this wasn’t too bad for a makeover which involved no tiling, no hefty plumbing and no living without a toilet whislt the work is being completed! None of the jobs required much DIY skills which resulted in a pretty stress free makeover and all of this was achieved for less than £400. So what are you waiting for, reach for the paintbrush, find a fresh new floor covering and pair it with some accessories in the same colours! (Check out the shop the style below to find anything shown in the makeover)


1. Flamingo Print – from £12.71 (Click Here) | 2. MIRA Virtue Filler Tap – £109.00 (Click Here) | 3. Flooring Black & White – £10.99 per M SQ (Click Here) | 4. Nottingham Grey Panel – £35.00 (Click Here) | 5. Valspar Coal Tipple – Depends on paint type (Click Here) | 6. Christy Towels in Coral – From £4.00 (Click Here) | 7. Primark Faux String Pearl Plant – £6.00 each (Click Here) | 8. Little Greene Shallows – Depends on paint type (Click Here) | 9. Little Greene Orange Aurora – Depends on paint type (Click Here)| 10. Ritz Basin Taps – £19.97 (Click Here)
.
.
.
Although items in the renovation were kindly gifted to me the opinions in this blog and choice of design was not compromised.










Excellent job, Jack! Xx
LikeLike